SIDEBAR
»
S
I
D
E
B
A
R
«
Tuesday May 29, 2018: Aquafaba Meringues (also known as Chickpea Water Meringues)
May 31st, 2018 by Kate

Hi! Welcome to kidscookdinner.com.  We’re Max and Alex Koster and this is our blog where we talk about cooking and eating and try new weird things….like tonight when we tried to make meringues out of chickpea water.  We had tried a while ago and last time it was pretty much an epic fail.  (At first they looked amazing, then they ultimately collapsed into nothingness as we baked them. ) This time, however, it worked!  And it’s incredible simple.

First preheat the oven to 250 degrees.

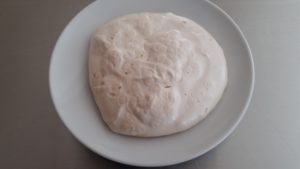
Then drain (and keep) the liquid from a 15 ounce can of chick peas (save the chickpeas too…we like them sauteed in salads, but not part of the meringues).

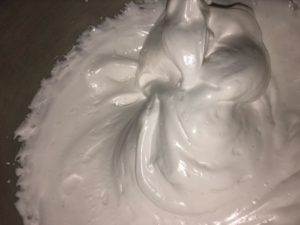
Next, beat the chickpea liquid (AKA aquafaba) in mixer with the whisk attachment till stiff peaks form (10-15 minutes or so).

Then you add one heaping cup of sugar and beat in, and then, finally, add 1 teaspoon of vanilla (and whip in).  NOTE: it is important to add a HEAPING cup of sugar.  Last time not only did we not add a heaping cup, we only added 1/2 a cup instead of a full one. Don’t make that mistake.  You need the sugar in this for structure!

21652

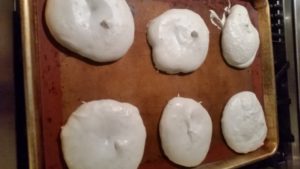
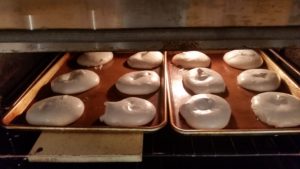
After that you scoop the aquafaba meringue mix onto lined baking sheets and cook for 90 minutes.  Let sit for 10 minutes and serve, or store in an air tight container.

20180529_225011    20180529_221218

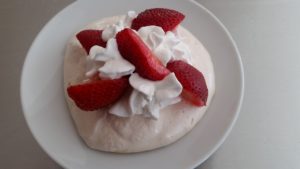
We prefer ours with whipped cream and strawberries.  And they really do taste like real meringues! Yummy

20180530_144559    20180530_144659

Sunday May 20, 2018: Dinner No. 113: Deconstructed Beef Wellington for Mom’s Birthday!
May 22nd, 2018 by Kate

Hi! Welcome to kidscookdinner.com.  Here’s what we cooked for a special celebration:

This Sunday we were celebrating Mom’s birthday AND the fact that a Trader Joe’s opened just a few blocks away.  To celebrate we decided to make Deconstructed Beef Wellington, a kumato-feta salad and orso on the side.   We decided that we actually prefer traditional Beef Wellington (where the filet mignon and mushroom filling are completely enclosed in puff pastry) but mom specifically requested the deconstructed version because she thinks it’s a little lighter (and definitely faster to make.) Anyway, Happy Birthday Mom, we love you.

20180520_200033

The first step in making Beef Wellington is either making puff pastry or  buying and then thawing pre-made frozen puff pastry.  We chose the latter (we did have soccer games this weekend!) and set it out to thaw.  Then we cleaned and chopped two pounds of mushrooms.   Then we cooked the mushrooms with  butter and our secret ingredient — truffle salt.  Alex was in charge of the mushrooms while Max was in charge of the beef and salad.

20180520_183543  20180520_184232  20180520_190220  20180520_190919

Meanwhile, we tied our filet mignons together with string (filet mignon courtesy of Trader Joe’s) and salt and peppered both sides.  We also cut the puff pastry into rounds and popped them in the oven to bake, and finished sauteeing the mushrooms.

20180520_190623  20180520_191744  20180520_193425 20180520_194543

The final step was to cook the filet.  We seared them 4 minutes on each side but they were so thick that we had to finish them in the oven (luckily still warm from the puff pastry).  Then we removed the string from the filets and assembled the masterpieces:  first a half a round of puff pastry, then the cooked mushrooms, then a filet, then more mushrooms, then the top.  For mom’s plate we added even more mushrooms on the side because she loves them.  We also put together a simple salad of feta cheese, kumato tomatoes and arugula and made orso.  (We know the Beef Wellington sort of looks like a burger but it definitely didn’t taste like one.  It was delicious–the filet just melted in your mouth like butter.

20180520_192853(0)  20180520_195817

Sunday May 12, 2018: Dinner No. 112: Lamb Chops, Sweet Pea Soup and Green Salad
May 16th, 2018 by Kate

Hi! Welcome to kidscookdinner.com.  We’re Max and Alex Koster and this is our blog where we talk about cooking and eating and try to encourage kids to cook.  Today we wanted to make mom a special dinner (since it’s Mother’s Day), so we cooked some of her favorites: grilled lamb chops, sweet pea soup and a fresh green salad with goat cheese and walnuts.  Max made the soup early in the afternoon to let the flavors meld and Alex made the marinade for the lamb and grilled the chops.  We both cooperated on the couscous and green salad.  Happy Mother’s Day to all the moms out there!

Mother'sDayMeal

Sweet Pea Soup

The recipe for pea soup is really simple.  First you chop an onion and sautee it in butter. Then you add 7 cups of frozen peas and 3 cups chicken broth.  You let that simmer for a while then blend together.  We tried using a hand held immersion blender but it was taking too long so we switched over to the trusty blender.  You can serve it cold, room temperature or warm.  We made it ahead of time and served it at room temperature.

20180513_152734  20180513_153940 20180513_161032  20180513_162307

Marinade for Lamb

I (Alex) wanted to make a simple marinade for the lamb chops to give them a little more flavor so I combined lemon juice, olive oil, chopped garlic and a little rosemary.  I whisked those ingredients all together and then I let the lamb sit in the marinade for about an hour, flipping them over half way through.  Then it was time to grill them.

20180513_173405  20180513_173641  20180513_174032 20180513_174547

Green Salad

While the lamb chops grilled, we both made a simple green salad of butter letuce, walnuts, goat cheese and cranberries and made couscous.  The lamb chops were so thick that we had to finish them in the oven!

20180513_190815  20180513_190809  20180513_191356

Final Plates

Here’s what the soup looked like when we served it (we had sour cream on the side in case people wanted that)

Mother'sDaySoup

And here’s the whole family, including Koko, about to dig in.

MothersDayFamily


Saturday, May 5, 2018: Yogurt and Herbs
May 9th, 2018 by Kate

Welcome to kidscookdinner.com.  We hope you’ve enjoyed what you read so far…

Today we decided to try out mom’s new multicooker (Max got it for mom for Christmas, but really he got it so we could try it).  One of the uses is to make yogurt so we decided to do that. Also, since it’s finally warm outside we bought our favorite herbs and replanted them on our balcony. We love fresh herbs and if they are on our balcony, we can use them whenever we want.

Yogurt

The first step is to heat 5 cups of milk to approximately 180 degrees farenheit.  This is to kill any bad bacteria and make the yogurt taste richer. (We measured it with a meat thermometer, so hopefully that was accurate).  Then we let the milk cool slightly and whisked in 1/2 cup plain yogurt (this is the “starter” yogurt.)  Finally,  you lock the milk-yogurt mixture into your multicooker, hit the yogurt button and let cook for 8 hours.  When we opened the top, we had yogurt.  It was a little liquidy but definitely tasted like yogurt.  To celebrate we made our favorite yogurt-marinated tandoori chicken!

20180505_091830  20180505_081506  20180505_081325   20180505_175021 20180406_214536

Herbs

We bought thyme, rosemary and two basil plants (because basil is our favorite herb) and transplanted them into bigger pots. Now we just have to remember to water them!

20180505_165148   20180505_170859


»  Substance:WordPress   »  Style:Ahren Ahimsa